
 |
 |
 |
-in-1946-01.jpg) |
 |
 |
 |
 |
 |
 |
 |
 |
 |
 |
 |
 |
 |
 |
 |
 |
 |
 |
 |
Dutch East Indies during World War II
Mitsubishi A6M Zero and its involvement in the Dutch East Indies during World War II
The Mitsubishi A6M Zero, also known as the "Zeke" to the Allies, played a significant role in the military campaigns across the Dutch East Indies during World War II.
Early Successes: The Zero was instrumental in the Japanese invasion of the Dutch East Indies. From December 1941 to March 1942, around 200 A6M2 Zeros were involved, achieving a high success rate against a variety of Allied aircraft. In this period, they reportedly downed 471 enemy aircraft out of 565 total enemy losses, showcasing their dominance in the early stages of the Pacific War. Aircraft Engaged: The Zeros faced off against a range of Allied fighters including the Brewster Model 339 Buffalo, Curtiss-Wright CW-21B Demon, Curtiss Hawk 75A-7, and Curtiss P-40 Warhawk. These Allied fighters were generally outmatched by the Zero in terms of maneuverability and range, leading to significant losses for the Dutch, British, American, and Australian forces.
Key Battles: Java Campaign: The Zero was central to air operations during the invasion of Java, where they protected Japanese bombers and naval forces, ensuring air superiority which was crucial for the successful Japanese landings. The Dutch capitulated on March 8, 1942, largely due to the overwhelming performance of the Zero in the skies.
Balikpapan and Avon Bases: The A6M2-N floatplane variant of the Zero was used to protect fueling depots in these locations, demonstrating its versatility by operating in both land and sea-based roles.
Tactics: Japanese pilots employed tactics leveraging the Zero's strengths, such as its long range and excellent maneuverability, to outflank and outmaneuver their opponents. The Zero's ability to operate at extended ranges allowed for surprise attacks and long-duration patrols, which were pivotal in the strategic envelopment of the Dutch East Indies.
Impact: The success of the Zero in these campaigns helped secure Japanese control over the resource-rich Dutch East Indies, which was vital for Japan's war efforts, providing them with oil, rubber, and other materials.
Later Operations: As the campaign moved towards New Guinea and the Solomon Islands, the Zero continued to dominate the initial engagements against Allied fighters like the P-40s and P-39s, further extending Japanese control over Southeast Asia.
The effectiveness of the Mitsubishi A6M Zero in these battles contributed significantly to the rapid fall of the Dutch East Indies to Japanese forces in early 1942, before the Allies could adapt their tactics and introduce more capable aircraft to counter the Zero's advantages.
Locations Involved in the Dutch East Indies Campaign
The locations involved in the battles featuring the Mitsubishi A6M Zero during the Japanese campaign in the Dutch East Indies include:
Tarakan: An island off the northeast coast of Borneo, known for its oil production.
Balikpapan: Also on Borneo, its oil refineries were crucial for both the Allies and the Japanese.
Makassar: A port city on the southwestern peninsula of Sulawesi, important for its air and naval facilities.
Palembang: On the island of Sumatra, this city was significant due to its oil refineries, one of the largest in Southeast Asia at the time.
Java Sea: Not a location per se, but the site of a major naval battle where Zeros provided air support, covering the waters around Java.
Bandung: An inland city in West Java, a key administrative and military center, targeted in the final push to control Java.
Surabaya: The second-largest city in Java and a major naval base, it was one of the last significant strongholds before the Dutch capitulation.Additional areas where Japanese forces, supported by Zero fighters, were active but might not have been directly involved in major battles include:
Ambon: An island where the Japanese made landings to secure airfields and disrupt Allied communications.
Kendari: On Sulawesi, where an airfield was captured to serve as a forward base for further operations.
Kupang: Located in the western part of Timor, where the Japanese aimed to isolate Australia from the Dutch East Indies.
Manado: In northern Sulawesi, taken early in the campaign to establish air superiority.These locations were all part of the broader strategy to capture resource-rich areas, secure strategic airfields, and isolate and conquer the Dutch East Indies, thereby cutting off Allied supply routes and bolstering Japan's war effort with vital resources.
Notable Aerial Battles during the Dutch East Indies Campaign
Battle of Tarakan (January 11-12, 1942)
Context: Tarakan was an important oil-producing island, making it a strategic target for Japan's resource acquisition.
Elaboration: Japanese forces conducted a two-pronged assault, with landings on both the north and south of the island. Zeros from the 21st and 23rd Air Flotillas, flying from nearby Borneo, provided continuous air cover and engaged in skirmishes with Dutch Brewster Buffalos and Martin B-10 bombers. The air superiority established by the Zeros was crucial in preventing Allied reinforcements and counterattacks, leading to the quick capture of the island.Battle of Balikpapan (January 23-24, 1942)
Context: Balikpapan was another significant oil center, with refineries and oil storage facilities that were vital for Japan's war machine.
Elaboration: The Tainan Air Group's Zeros were particularly effective here, not only defending the airspace but also conducting strafing runs on Allied positions and infrastructure. The Dutch, with limited air support, faced overwhelming odds. The Zeros' performance allowed Japanese ground forces to secure the area with minimal resistance. The destruction of oil facilities was a significant blow to Allied resources in the region.
Battle of Makassar (February 8-9, 1942)
Context: Makassar was a key port and airbase on Sulawesi, crucial for further operations in the region.
Elaboration: The 2nd Air Group's Zeros ensured that Japanese landings met with little aerial opposition. They engaged in dogfights with Dutch and Australian aircraft, including the Hawker Hurricane, which was outclassed by the Zero. The capture of Makassar allowed Japan to extend its air operations further south and east, tightening the noose around Java.
Battle of Palembang (February 13-15, 1942)
Context: Palembang on Sumatra was famous for its oil refineries, making it a prime target.
Elaboration: This operation included Japan’s first use of airborne troops, with Zeros from the 1st and 3rd Air Groups escorting paratroopers and then providing close air support. The air battle was intense, with Zeros engaging Brewsters and P-40s. The control of Palembang's oil was a significant strategic gain for Japan, though the refineries were heavily damaged.Battle of Java Sea (February 27, 1942)
Context: This was part of the broader strategy to isolate Java from external support.
Elaboration: While the primary combat was naval, Zeros from the 23rd Air Flotilla played a critical role in reconnaissance, bombing, and strafing Allied ships, as well as engaging any Allied aircraft that attempted to intervene. This contributed to the decisive Japanese victory, which led to the severing of Java's sea supply lines.Battle of Bandung (March 1, 1942)
Context: Bandung was a key city in the interior of Java, part of the final stages of the campaign.
Elaboration: As the Japanese moved inland, Zeros provided air support, bombing and strafing Dutch positions. They also intercepted and engaged Allied aircraft trying to support or evacuate from Java. The air cover was vital in the rapid advance of Japanese forces, leading to the encirclement and capitulation of Bandung.Battle of Surabaya (March 7-8, 1942)
Context: Surabaya was the last major stronghold in Java before the Dutch surrender.
Elaboration: Zeros from the Tainan and 3rd Air Groups dominated the skies, allowing Japanese ground troops to converge on the city. They engaged in numerous dogfights, securing air superiority. The continuous air attacks demoralized the defenders and paved the way for the final capitulation of Dutch forces in Java.These battles collectively showcased the Zero's pivotal role in the Japanese strategy, leveraging air superiority to support amphibious assaults, protect naval operations, and conduct effective ground support, ultimately leading to the fall of the Dutch East Indies.
Mitsubishi A6M Zero Post-March 1942
Japanese Consolidation and Defense (March 1942 - Late 1942)
Occupation and Air Patrols: After the conquest of Java, Zeros were used for patrolling and defending the newly acquired territories from Allied air raids. They were stationed across multiple airbases in Java, Sumatra, Borneo, and other islands to maintain air superiority.
Raids on Australia: Zeros escorted bombing raids on northern Australia, particularly targeting Darwin, aiming to disrupt Allied supply lines and bases.
Defensive Actions: Zeros engaged in defensive actions against Allied reconnaissance missions and bombing runs, intercepting and combating occasional raids on key installations.New Guinea and Solomon Islands Campaigns (Late 1942 - 1943)
Battle of the Coral Sea (May 4-8, 1942): Zeros from land-based units contributed to reconnaissance and sometimes engaged Allied aircraft during this carrier battle.
Defense of Rabaul: Zeros defended this major stronghold from Allied air attacks, engaging in numerous dogfights.
Guadalcanal Campaign: Zeros provided air cover for ground forces and engaged in aerial combat against increasingly sophisticated Allied aircraft.Air Superiority Challenges (1943 - 1945)
Battle of the Bismarck Sea (March 2-4, 1943): Zeros attempted to protect Japanese convoys but faced heavy losses.
New Guinea Campaign: Zeros were involved in maintaining air superiority as the Allies advanced, with diminishing success.
Philippines and Formosa (1944-1945): Participated in defense against massive US air raids, facing overwhelming American air power.
Kamikaze Operations: Towards the war's end, some Zeros were modified for kamikaze attacks.Final Days (1945)
Defense of the Home Islands: Zeros defended Japan from B-29 Superfortress raids, often in suicide missions or traditional dogfights.
Surrender: With Japan's surrender on August 15, 1945, the operational use of the Zero ended. Many were destroyed, while others were captured for evaluation by the Allies.These activities illustrate the Zero's transition from conquest to defense, facing increasingly challenging circumstances as the war progressed and Allied air power dominated.


The Buffalo’s fight to the End.
Brewster F2A Buffalo
POLISH & ENGLISH PUBLICATION by Andre R. Zbiegniewski published by Kagero
The orders placed with the USA by the British purchasing delegation in the early spring of 1940 included, among others, 170 unequipped Brewster F2A-2s. This gave birth to an un-naval version which the manufacturer named the Model 339E, whereas the recipient, Buffalo Mkl.
After being fitted with such add-ons as cockpit and fuel tanks armor as well as a heavier Hamilton Standard propeller, it was the heaviest F2A of all (ca. 3,100 kg). The RAF department of supplies gave the aircraft serial numbers W8131-W8250 and AN168-AN221.
Apart from the first three machines, sent for tests to the British Isles, the remaining 167 were shipped straight from the factory to RAF depots in Singapore in April 1941. The forming of five Buffalo squadrons as set out in plans of Malayan defense was going quite smoothly.
Only 154 fighters survived until the autumn, when all these units were finally in combat readiness. At least twenty had been lost in flying accidents, whereas three had probably been reconstructed to perform photo reconnaissance tasks. They were then assigned to the newly formed 4 PRU (Photo Reconnaissance Unit).
The warfare which began on December 8, 1941 (December 7 in Pearl Harbor’s time zone) with a Japanese landing on the north-eastern coast of the Malayan Peninsula saw the Buffalo squadrons thrown into the very midst of combat. The greatest pressure was exerted upon the north-based elements of 21 Sqn RAAF and 243 Sqn RAF.
Having learned about the landing of considerable enemy forces on the beaches around the river Kemassin estuary, a few Buffalos of 243 Sqn were deployed there from Kota Bharu soon after dawn. Flt Off Holder’s WP-U (W8196) and Flt Off Shield’s WP-X (AN221) fell like a pair of hawks upon the troop-filled beaches, machine-gunning and even causing temporary panic among the enemies.
However, the Buffalo’s low capability to withstand (even small-caliber) ground fire was soon discovered. A few accidental hits by rifle bullets were enough to put Holder’s aircraft out of the game, obliging him to immediately break up his mission and return home in an unstable machine. An attempt to land with damaged brakes on the Kota Bharu strip ended in WP-U’s collision with the wreckage of a Hudson from 1 Sqn RAAF.
Anxious for his comrade, Flt Off Shield considered the task completed and he, too, headed back for the base. However, WP-X’s engine now began to choke, throwing out oil, which gradually covered the windshield. Experiencing limited forward visibility, the pilot had to open the canopy.
Looking around for bearings, he was surprised to see nine unescorted bombers a little below. “They were flying in an ideal formation, like on a training flight, showing their uniformly pearly (rather light grey - author’s note) camouflage. The tops of their tails were decorated with yellow patterns. I identified the twin-engined aircraft as Ki-21s". They probably belonged to 3 Chutai/62 Sentai, returning from a raid on Machang.
Despite his unfavorable position, Shield was determined to attack. Only on approaching the enemy to within the effective fire range (300 m) did he see that his weapons were not working. He could but return to base. This way the indifferent fate left unused the first opportunity to open the Buffalo’s Far-Eastern tally.
Not long before dawn on December 8, Singapore experienced the first raid. Approaching the metropolis after an almost 1,000 km long flight, the Mihoro Kokutai bombers had been plotted early enough by British radars. Unfortunately, there was no man at the RAF HQ who was determined to do something about it.
The seventeen G3Ms arrived over the island from north-west, finding a richly illuminated city, which nobody had taken care to prepare for such a possibility. Three Buffalos from 453 Sqn RAAF which were waiting at readiness on the Sembawang air strip did not scramble to intercept the aggressors because... the British commander of the base had forbidden it (!). Two hundred were killed or wounded by bombs in the city and at adjacent airfields.
Mounting a RAF counterattack against the Japanese beachhead in the north of Malaya continued well into the morning. After bombers and fighters had taken off from Kuantan and Sungei Patani, four Buffalos of 21 Sqn RAAF were left to defend the latter. The pilots of two - Flt Lt. Hooper in GA-D (AN194) and Flt Off Kirkman in GA-K (AN201) - turned out to be the only ones who were determined to take off.
It came out soon when Japanese bombers suddenly emerged low above the airfield dropping a multitude of fragmentation bombs. Mottled grey and green, the Ki-21s of 98 Sentai majestically passed over the base, completely disregarding the sparse and inaccurate AA fire. Despite bombs ripping the ground and debris whizzing about, Hooper’s and Kirkman’s barrelish fighters rolled onto the runway. Both aircraft got airborne to a great astonishment of the RAF personnel, who cringed in shelters.
Engines moaning at full throttle, the pilots arduously closed on the re-approaching formation from astern. The twin-engined bodies grew larger in their gunsights. Light grey, green-striped fuselages were adorned with horizontal blue waves on the tails - the emblem of the staff Chutai of 98 Sentai. To be on the safe side, the Buffalos approached to less than 300 meters.
The enemy gunners would open fire any moment now. Meanwhile, the fighters unlock their weapons, press the triggers and... nothing - complete silence! All machine guns on both fighters jammed. What a damn luck! - both Australians will keep saying on return to base.
Prior to this, however, the bombs of 98 Sentai, unmoved by the vain action of the two Buffalos, affected Sungei Patani quite badly. They hit No. 21 Sqn aircraft stowed at the highest, and therefore the driest, point of the boggy airfield. Two Buffalos were totally destroyed, while five were heavily damaged. Two pilots and sixteen civilian workers were killed in airfield buildings hit by bombs.
On the morning of December 8 the Singapore-based RAF HQ deployed aircraft of the 4 PRU to reconnoiter over other north-Malayan beaches suitable for landing operations. The Singora region was to be photographed by Sgt Wareham in an unarmed Buffalo W8166. To his extreme surprise, he found the assigned stretch of coastline crowded with anchored (40) warships, landing craft, large seaplanes and Japanese landing troops. Their head was already advancing from the established beachhead towards the south-east.
They even had aerial cover, which was soon discovered by Flt Lt. Kinninmont and his wingman, Sgt. Chapman of 21 Sqn RAAF, who were caught in an ambush set over the southern approach to Singora by twelve Ki-27s from 11 Sentai loitering around. The Japanese fighters rushed wildly on the two Buffalos, getting in each other’s way. Hampering one another in keeping effective fire, they enabled the Australians to escape the dire straits in a mad dive almost to the ground. Covering the remaining distance just above the palm tree tops, Kinninmont’s and Chapman’s shot-up aircraft managed to reach Sungei Patani.
There, they experienced another raid by over twenty Japanese bombers at 10.45. Since there had been no earlier warning, the commander of 21 Sqn would not allow the five ready Buffalos to scramble under the shower of bombs. This way, the undisturbed raiders systematically destroyed buildings, depots, and air strips of the airfield. The few still serviceable RAF aircraft and the remains of 21 Sqn began preparations for a southward evacuation.
Next day they found themselves at Butterworth base, situated on the west coast, where they would soon experience the same situation. On December 8 Kinninmont attempted to make a last reconnaissance sortie in a Buffalo GA-? (W8232). Appearing to the south of Singora, this A flight machine of 21 Sqn was chased away by very active Ki-43s of 59 Sentai.
On the afternoon of December 9, four Buffalos of 21 Sqn returning from a recalled escort mission for Singora-targeting RAF bombers encountered Japanese fighters over Butterworth. Taking advantage of the element of surprise, the Ki-27s quickly brought down in flames Flt Lt. McKenny’s aircraft (W8224, probably GA-G). The pilot bailed out and landed in the bay. Flt Lt. Williams in GA-? (W8232) was shot down next and crashed upon force-landing, the pilot surviving.
There being a multitude of attackers, Flt Off Montefiore decided to maintain constant fire. Convinced that he would not leave the battlefield alive, anyway, he was not afraid to overheat his machine guns. Fire bursting forth, his burst framed one of the head-on attacking Ki-27s. Small explosions appeared at its starboard wing root, and one of the main legs broke off. The Japanese shook and plunged down, pouring smoke from under the cowling. All that lasted a few seconds.
Right after that, equally accurate bursts of some 11 Sentai pilot drummed on the Buffalo W8236’s engine cowling. Flames burst in the Australian’s face, he abandoned the aircraft as fast as he could. His parachute canopy soon hanged from a tall palm. What a coincidence - landing amidst coconut palms. But at the same time, how great the joy of having survived.
A badly shot-up fourth Buffalo made an arbitrary landing on a rice field across the strait. The pilot returned to base by ferry, but GA-M (AN188), considered repairable at first, never again took to the air.
The loss of four 21 Sqn machines over Butterworth made the RAF authorities aware of the serious situation. Even in this part of Malaya, Japanese supremacy in the air was noticeable and overwhelming. A decision was made to withdraw still farther to the south. The remains of the British and Australian squadrons from northern Malaya occupied Ipoh airfield the next day. Everyone realized how low their combat value was. The personnel’s low morale combined with the primitive living conditions and unprepared airfield did not guarantee the necessary effectiveness when they would face another (failed) trial the day after.
On the late afternoon of December 8 the battleship HMS Prince of Wales and battle cruiser HMS Repulse departed Singapore with an escort, heading for the area of Japanese landings. The aerial cover guarantee that the RAF had given the Force Z commander, Adm. Phillips, was a false promise. Having been destroyed, majority of northern and central Malayan airfields were now out of service. The direct consequence of that was the known and often described massacre of the British group on December 9. The sinking of both dreadnoughts by Japanese aircraft, a thousand people being killed in the process, was the most painful blow struck to date at the British interests in the Far East.
Accidentally, Buffalo pilots of 243 Sqn RAF, 453 Sqn RAAF and 4 PRU witnessed this defeat. Called into action too late, they could but watch the thousands of men struggling in the water. The great victory of the Japanese air forces decided the fate of northern Malaya. Demoralized British units of all arms were retreating south in panic, the last Buffalo squadrons among them. Their airfields situated at the Thai border were being seized by the Japanese. With a whole lot of untouched inventory (fuel depots, ammunition depots and other equipment), this was “a completely unexpected gift from Churchill”.
The remains of 21 Sqn RAAF were joined at Ipoh by a flight of Buffalos from 243 Sqn RAF on December 12. Fit Off Holder, who commanded it, came with sergeants: Oliver, Fisken and Wipiti, and Fit Lt Phillips in W8166 of 4 PRU. Although assigned fighter-bomber duties at Singapore, the new-arrived five machines were mainly sent out for reconnaissance by their new commander. A more offensive attitude was taken next day (December 13) by 453 Sqn RAAF.
The squadron’s sixteen aircraft set out from Sembawang in the morning, ordered to reconnoiter over the Thai border area, and then land and remain at Ipoh. They were interrupted while refueling on an intermediate landing at Butterworth, and scrambled on a warning about enemy bombers approaching nearby Penang (across the strait). 453 Sqn’s leader, Fit Lt Vanderfield (TD-V, AN185), was first to notice the enemy and, diving without hesitation, he scored an inaugural victory. His victim was a single-engined Ki-51 bomber of 71 Chutai, another one, this time a Ki-48 of 75 Sentai, falling a moment later.
Three others were annihilated by two other Australians, one being Sgt Read in a Buffalo GA-F (W8209). The defeated Ki-51s were reported as “Stuka-type dive-bombers”. The five Buffalos landed at Butterworth a moment before thirty Ki-27s attacked. The leader of the Australians, Fit Lt Vigors, and his wingmen, Fit Lt Grace and Sgt O’Mara, decided to take off again. Climbing over the Penang island, the three Buffalos let pass the formation of 1 and 11 Sentais flying below at a minimal level.
After a flashing bunt, Vigors’ threesome gave chase, diving after the enemy. Covering one another, they managed to break up the Japanese formation and engage them. Fit Lt Vigors put a few accurate bursts in several opponents. Himself and ground onlookers would later confirm “three victories following these hits”. However, the Buffalo pilots were helpless regarding the excellent agility of the Ki-27. This resulted after a while in AN213, and thus also Vigors, becoming a target, one of the bullets setting the ventral fuel tank on fire. He bailed out of the burning aircraft literally at the last moment, landing in the jungle which covered a coastal mountain range to the north of the city.
Both wingmen force-landed their damaged W8159 and W8192 near Ipoh. The fate of Pit Off Angus and his Buffalo TD-F (AN210) was similar after they had received a burst from a Japanese fighter. Of those who had scrambled during the raid, Sgt Oelrich was most unsuccessful, getting killed following his TD-? W8225 being shot down by combined fire from Ki-27s and the airfield AA. Generally, it would be far from true to say the defenders were successful. The Japanese pressure plus persistent rumors about an unavoidable Japanese air landing operation resulted in a sooner evacuation of the airfields at Butterworth and Penang. Only half of 453 Sqn’s sixteen Buffalos that set out from Singapore on the morning of December 14 reached Ipoh in the evening.
The personnel of 21 Sqn RAAF began to hope that they would be released and sent south. However, that was not the case - only four 243 Sqn RAF fighters were to return to Singapore. The joint forces of both Australian squadrons, now designated 21/453 Sqn, remained at the more and more threatened Ipoh. Their first task was a sweep over Alor Star airfield, recently seized by the enemy. Five Buffalos were deployed there at dawn under Fit Lt White (two machines from 21 Sqn and three from 453 Sqn).
Two of them returned to base having failed to find the target. The other three, including the leading White, made a successful attack on the target and headed back, soon to encounter a Japanese dive-bomber flight. Actually, both flights were headed for Ipoh, except that the 27 Sentai bombers were going to raid the base. The enemy was first to recover from the mutual surprise. The leading Ki-51 shot down White’s Buffalo. GA-T W8180 with the pilot inside fell into the jungle to the southwest of Taiping.
Sgt Board of 453 Sqn claimed to have successfully shot up a Zero (?), which fell in flames near the site of White’s death. Like his wingman, Sgt Seagoe’s, machine (TD-X W8211), Board’s fighter (TD-Z W8216) was also slightly damaged by Ki-51s’ return fire. However, both made Ipoh. In the late afternoon, three volunteers, former pilots of 62 Sqn RAF (Blenheim-equipped), reported to the base, arriving from Butterworth in three repaired Buffalos of 453 Sqn.
As December 15 came on, only these three fighters were serviceable at Ipoh. Supplies from Singapore were stopped by the monsoon weather, obliging the 21 Sqn and 453 Sqn aircraft which were already on their way to turn back or force-land. Rare attempts to intercept Japanese aircraft were hampered by constantly jamming weapons on all the Buffalos. December 15’s only success was the shootdown of one of nineteen Ki-48s which tried to bomb the base before noon. This success was credited as a shared one to Cap Vanderfield two sergeants who accompanied him.
The rest of the north-Malayan airfields felt a constantly increasing Japanese pressure from mid-December. On the 17th the fighters of 21/453 Sqn patrolling near Ipoh took several combat challenges made by 59 Sentai. The engagements with that unit’s Ki-43s were always inconclusive, but they enabled other enemy fighter groups and the bombers they escorted to attack their targets at will. The number of victims and destroyed equipment around the base was thus on a constant upward climb.
The pressure from the ubiquitous Japanese air forces would from then on influence the decisions of gradual, but systematic withdrawal of the serviceable Buffalos south. The relative, although illusory safety of such bases as Kuala Lumpur, now seemed to the British commanders the only alternative of a battle for the area north of Singapore that was destined to fail.
Beginning December 21, Kuala Lumpur, so far considered a safe rear base, began to be raided. The pairs of readiness Buffalos from 453 Sqn were again unsuccessful in dealing with the more numerous opponents. 59 Sentai fighters did a lot better, bringing down Sgt Leys’ machine (W8207; probably TD-Y). One of the Ki-48 bombers were added to the Australian victories, 90 Sentai losing it to Sgt Peterson in the second wave of the raid.
The entire 453 Sqn was scrambled before noon on December 22 from Kuala Lumpur. All the twelve serviceable Buffalos were deployed to intercept six intruders approaching fast at high altitude. Contrary to the British radar operator’s reports, the air proved full of enemies, the six Ki-43s having been only bait. The eighteen fighters from the elite 64 Sentai engaged with the twelve Buffalos, fighting over half an hour. The three kills that the Australians claimed in its course came at a rather high price, Japanese aces’ bullets taking two pilots and six fighters.
The hero of the battle over Kuala Lumpur was Sgt Read. Using his damaged Buffalo (TD-F) W8209, he rammed one of the opponents - probably Lt Takayama, an ace and commander of one of 64 Sentai’s Chutais. The take-off for another mission of the remains of 453 Sqn was recalled on December 22 because of a beginning air raid. The recalling signal was not heard only by Sgt Peterson, who was already rolling along the airstrip. His TD-A fell victim to a diving Ki-43 shortly after it disconnected from the ground. The pilot was killed - to the squadron, his death was the straw that broke the camel’s back.
453 Sqn RAAF was withdrawn to Sembawang, where it joined the B Flight of 21 Sqn. They were to be supported by the units stationed at nearby Kallang: 243 Sqn RAF, a flight of the Dutch 2-VLG V and, so far not tried in combat, 488 Sqn RNZAF. The Malayan airfields seized by the aggressors had in the meantime become new bases of twelve air groups of the IJAAF and IJNAF. Seven bomber and six fighter groups were rebased toward the end of December from Indochina to the Kota Bharu-Sungei Patani region.
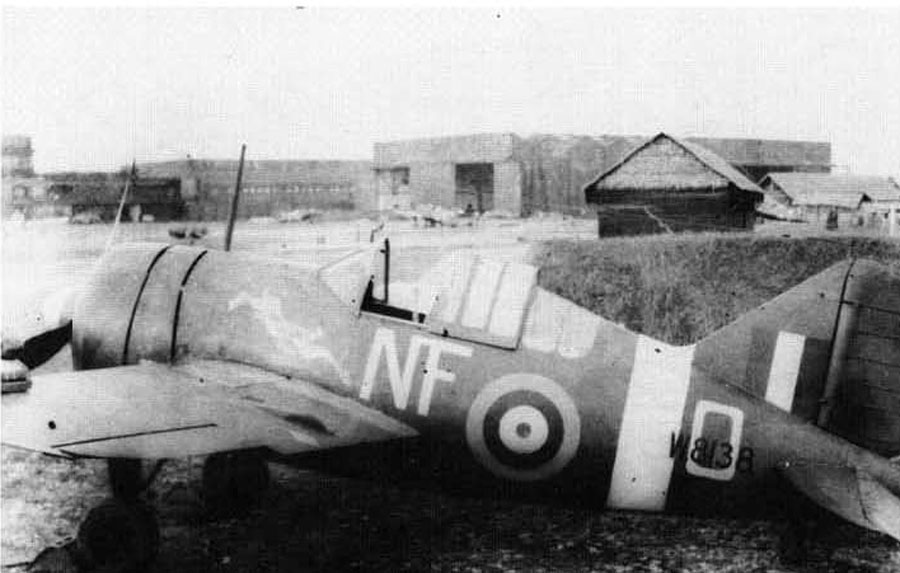
Japanese aircraft and the personnel that was assigned to them now swarmed all over the area. Their objective was obviously a possibly soonest resumption of the offensive against Singapore and other American, British, Dutch and French possessions. The Japanese pressure now slightly lower, the Buffalo squadrons spent the last days of the year in reorganizing, training and further unsuccessful attempts to intercept Mihoro Kokutai’s night raids. Apart from two accidents which happened to three 488 Sqn fighters (including NF-? W8200) on training flights, the end of December was rather quiet.
From January 1 to 5, 1942 the Singapore-stationed Buffalos were forced to operate in unusually adverse weather conditions. Reconnaissance missions to the north also had to be flown in the same conditions. Besides, aerial cover had to be provided for the DM-1 convoy arriving from the south and carrying men and equipment required for maintaining the defense of southern Malaya. The enemy was not encountered over the convoy even once, but operating at the range limit cost 243, 21/453 and 488 Sqns four fighters crashed during forced landings far from their base.
Three other Buffalos were lost in accidents. 243 Sqn’s January 5 attempts to intercept Japanese bombers over Kluang were destined to fail - despite the short distance between this base and Kallang, the guidance and weather failed. During the early morning hours of January 6 two 21/453 Sqn fighters were dispatched from Sembawang on a sweep over the river Bernam estuary. Fit Lt Kirkman and Fig Off Sheppard did an excellent job of strafing a concentration of Japanese landing craft, claiming to have heavily damaged nine craft.
Afternoon was the time of the real combat debut of the entire 488 Sqn personnel. The patrol over Japanese shipping routes along the south-east coast ended without contact with the enemy. The same task was given two days later to 21/453 Sqn. Patrolling at low level along the coastline from Kluang to Kuantan, the Buffalos strafed landing craft and concentration of Japanese infantry troops. Having repeated the mission on the next day (January 9), the squadron was ordered to return to Sembawang.
January 10 brought the frustrated 243 Sqn pilots a spectacular success - an interception of a reconnaissance Ki-46. The very fast twin-engined machine of (Independent) 81 Chutai fell to the three pilots of the A Flight after they were excellently vectored by the radar network. The Japanese returned over Singapore on January 12. Over seventy Ki-27 fighters operating from a new base of Pekan caught seventeen Buffalos from 488 Sqn (among them two from 2-VLG V) near Johore.
The inexperienced New Zealanders and Dutchmen had little to say facing the veterans of 1 and 11 Sentai. This taken into account, the squadron’s losses should be considered light - only two downed Buffalos failed to return to Kallang, their pilots having bailed out to safety. Five fighters sustained damage. A second wave of attack, consisting of the entire strength of 98 Sentai (thirty Ki-21s) and escorted by 59 and 64 Sentais (forty Ki-43s), did not meet any more opponents in the air.
Despite the extensiveness of the operation, the Japanese’ accuracy of dropping bombs was far from good on that day. Also, the attackers’ losses turned out to be higher than Singapore’s defenders’. One Ki-21 was damaged over Johore by Dutch Ens. Swarts. Four Ki-43s had a flying accident at Sungei Patani airfield. All had to be written off, and two 59 Sentai pilots died.
A massive formation of IJAAF fighters returned over Singapore in the afternoon, encountering on that occasion several Buffalos from 488 Sqn, 243 Sqn and 2-VLG V at an altitude of over 4,000 m. The latter unit’s commander’s aide, Lt. Deibel, claimed two Ki-27 shot down before he himself had to bail out of his burning Model 339C. One Japanese was scored by each commander of 2-VLG V, Fit Lt Flelsdingen, and his wingman, Sgt Bruggink.
The B Flight of 243 Sqn was questionably successful. Fighting with a stronger enemy, Sgt Baldwin’s WP-R (W8187) sustained damage. Sgt Rankin did not have as much luck, any trace of him being lost along with his WP-Q (W8189). The flight’s honor was saved by Sgt Fisken in WP-O (W8147), who scored a confirmed victory over a Ki-27. 488 Sqn lost Sgt Newman, who died of wounds on return from the day’s second combat sortie.
Such a high level of losses, used up equipment reserves as well as insufficient number of pilots had decimated the Singapore-based Buffalos by the end of January. At the beginning of February the last serviceable Buffalos and the remaining Hurricanes were evacuated to Java and the nearby islands of the Dutch East Indies. The last four serviceable aircraft of 21 Sqn RAAF were given over to the ML-KNIL HQ at Andir. The personnel of 21 and 453 Sqns RAAF found themselves in Australia, waiting to be re-formed into new units which would never again have anything to do with the Buffalo.
Brewster Buffalo - Burma and Dutch East Indies
Even shorter and more tragic was the fate of 67 Sqn RAF, relocated from Singapore to Burma. The Japanese massively raiding Rangoon were pretty easy prey for the Buffalo as long as they were confined to unescorted bombers. However, when fighter escort appeared as part of Japanese missions, the situation changed radically for both 67 Sqn and the cooperating elements of the AVG.
Both units’ home base at Mingaladon near Rangoon was quickly discovered by the enemy, becoming the target of frequent raids. Their harassing strength was proved by the fact that it was these very raids, and not aerial engagements (in which only eight Buffalos were lost) that exhausted the unit’s combat potential. With no equipment supplies arriving, the low level of losses in human resources was of little importance.
67 Sqn RAF lost the status of a compact unit because of its equipment-related exhaustion, and not broken morale or flying personnel deficiency. Under the constant shower of Japanese bombs, the squadron’s last six serviceable aircraft were withdrawn to India in March 1942. The unit took with them an impressive, for those conditions, tally of 27 confirmed victories in the Burmese sky."
Two of the Buffalos evacuated to Madras were received by the Mohawk-equipped 146 Sqn RAF in the second quarter of 1942. One of them, which survived the rigors of training flying, found its way to the Indian Air Force at the end of the year. In total, of the over 150 Buffalos which the RAF had in the Far East on December 8, 1941 about 110 were lost in the air and on the ground following enemy operations.
The Dutch authorities had so far been convinced that bombers alone were enough to defend the NEI (Netherlands East Indies). They began to consider purchase of fighters as late as 1940. A delegation sent to the USA with this goal in mind returned with manufacturers’ assertions about availability of a few models. Without giving it much thought, the Dutch bought what was there. Apart from two types of Curtiss fighters, these were Brewster F2A-2 Model 339Cs.
The problem with the latter was (just like with the RAF’s order) the engine. Twenty four power plants of the Wright 1820-G105 type were to be supplied for the aircraft with Dutch serial numbers B3-95 to B3-118 by the buyer. Further 48 planes (B3-119 to B3-167) were fitted with newer Wright 1820-G205 engines, the aircraft being designated as the Model 339D to distinguish them from the previous ones. All the aircraft for the ML-KNIL had most of the equipment identical to that of the British Model 339E.
They began to arrive in the spring of 1941. Seventy one Model 339Cs and Ds were delivered to Javanese port of Batavia (now Jakarta) within a period of six months. Flying personnel deficiencies resulted in not all of them entering frontline service. The first to fly the new machines were the 1-VLG V and 2-VLG V squadrons. These units were equipped with a total of 24 Buffalos by July 1941.
Just as many were assigned to pilot schools as aircraft for advanced fighter training. The rest of the deliveries were treated as emergency reserves. Since it was impossible to defend the extensive island territory of the NEI, the new fighters were used for ensuring security of the most threatened, isolated centers of resistance. 1-VLG V was sent to the area of Borneo’s oil fields, while 2-VLG V was kept in the capital region of Java.
As the war threat was growing more serious, pilot schools were closed in November, their staffs and students becoming the personnel of two new Buffalo squadrons - 3-VLG IV and 3-VLG V. With the commencement of military operations 2-VLG V was relocated from Sempiak (Java) to Singapore. Operating from Kallang, the unit cooperated with British Commonwealth squadrons in defending southern Malaya until it was withdrawn to Borneo in the second half of January 1942.
The main task of the ML-KNIL forces in that region was to counteract Japanese landings at Tarakan and Balikpapan. On January 22 the pilots of 1- and 2-VLG V had the first opportunity to try bomb racks fitted to their fighters. With 50 kg bombs underwing, they accompanied Martin 139 bombers on their way against the enemy invasion fleet. They claimed to have sunk two army transports on this almost suicidal mission.
Similar operations were repeated many times. All such efforts would soon turn out to have been made in vain. The Japanese landing was completed, anyway, and the end of resistance on Borneo in late January was decided. All serviceable ‘339s were now grouped on Java and Sumatra, where intensive preparations for defense of the islands were going on. 3-VLG IV and 3-VLG V failed to prevent a Japanese air landing operation in the area of the Palembang refinery.
What they could do now was to act as ground attack aircraft and fighter-bombers supporting the desperate defense of Dutch troops in the remaining areas of Sumatra. 3-VLG IV was the first to be annihilated caught on the ground on February 9 during a successful raid by 98 Sentai. Borneo fell. Sumatra was to share the same fate within days.
At the beginning of February 1942 the entire Dutch air force in the NEI was withdrawn to Java. Among the 110 still operational ML-KNIL fighters and bombers were 34 Brewster 339Cs and Ds. They were now divided among what was left of three squadrons: 1-VLG V (fifteen Brewsters), 2-VLG V (eight) and 3-VLG IV (eleven). These units were stationed in the Andir-Tjisaoek region under Fit Lt van Rest.
When time came for the Japanese to begin operations in the western part of the island as late as February 9, other Dutch and Allied cooperating air groups had been fighting hard over eastern Java for a week. The enemy appearing over west-Javanese Allied air bases, with special emphasis on Batavia could have meant only one thing - preparing the area for a speedy invasion. The attack by forty bombers and fighters first badly affected Kemajoran and Tjililitan airfields. It was there that 3-VLG IV tried to respond.
A delayed scramble was attempted by five Brewsters, but they were immediately fallen upon by several watchful Zeros. The first to fall their prey was Sgt Huys’ aircraft, still rolling across the field. Ripped by a burst, the unarmored fuel tank exploded, turning the Model 339C into a ball of fire. By some decision of providence, the pilot was kind of catapulted out of the burning object, landing on the grass without any harm.
20-mm cannon bursts also perforated Sgt Berk’s Brewster before it had really gotten airborne. Right after take-off, the demolished, smoking wreckage of the fighter (probably number B-3120) crashed at the margin of the strip, killing the pilot. The sacrifice of their comrades allowed Ens. Weijnschenk and his wingman Butner to climb a little, and even a few times to open fire on the enemies who swarmed before them.
However, this was the end of both Dutchmen’s lucky streak. They were quickly fell upon by a flight of determined and accurately-shooting A6M2s of Tainan Kokutai. The 3-VLG IV pilots had to resort to all the tricks they had learnt of the art of fighter flying to at least slightly delay the still unavoidable final. Maneuvering at low altitude, leftward and rearward glides, engine braking, balancing on the verge of stalling - all was in vain against the experienced opponents.
Anyway, both Brewster pilots could have said they had been very lucky. Despite heavy combat damage, they were able to land their machines relatively safely, crashing in the vicinity of Kemajoran base. They came out of the dire straits injured and shocked by so sudden and unexpected a defeat, but still - they were alive. The only one of the five scrambling pilots who avoided the massacre was Sgt de Wilde. It happened rather by chance - he was lucky enough not to draw Zeros’ attention and, wisely, kept away from the incident, only returning after it had ended.
The other 3-VLG IV aircraft were, with one exception, destroyed on the ground by the unpunished Japanese fighters and bombers. Thus, one enemy raid swept the 3rd squadron off the ground. It was totally destroyed except for the last two Brewsters, withdrawn to Tjisaoek on the very same day. Since there was no equipment to restore the unit, both fighters were assigned to 2-VLG V. The short but violent fight of February 9, 1942 was a bad omen not only to the Dutch Brewsters, but also to the entire ML-KNIL air force.
Three days later, the remains of the unit were incorporated into 2-VLG V. In the second half of February, Sgt Jan Adam joined the leading aces of 3-VLG V - he became famous on the 19th when he successfully rammed a Ki-43 (59 Sentai) and then saved his own life by bailing out. Still, the great advantage in number and in quality possessed by 59 and 64 Sentais could not be neutralized even by such acts.
All, even those best camouflaged, Buffalo bases were soon discovered and then destroyed by Japanese bombers. By the end of the month Borneo, Celebes (now Sulawesi) and Sumatra came under control of the aggressors. The last Dutch point of resistance, also in the air, was Java. But the invasion fleet also sailed in that island’s direction on February 26, and there was really nothing to use for defense.
The remains of the three Buffalo squadrons, more than ten serviceable aircraft altogether, had in the meantime been collected at Andir. From there, the fighters, put under one commander, flew continuous combat sorties until March 7, 1942. Two aerial victories over Japanese pilots may be examples of their determination - these were achieved on their last sortie over Java, and came at the cost of one Buffalo. The resistance of the other Allied units in Java lasted only one day longer. Then there was only the capitulation.
RAAF 21 City of Melbourne Squadron
No 21 Squadron RAAF with Buffalo Mk1s was at Sungei Patani, in North West Malaya with a establishment of 18 Buffaloes (12 IE underscored, with 6 more IR held at Singapore) and one Wirraway (A20-59)(First Buffalo received 28/08/41; AN172, AN180, AN183, AN186, AN188, AN194, AN201, AN212, W8163, W8169, W8206, W8212, W8219, W8222, W8224, W8227, W8232, and W8236 with codes GA-* in Malaya) With heavy losses, and with only reserve aircraft available later that month, the unit merged with 453 Squadron to become 21/453 Squadron RAAF on 24th December 1941. The new squadron then moved to Sumatra but Japanese advances once again forced a withdrawal. The unit eventually abandoned Java and sailed to Fremantle, where it was disbanded on 4th March 1942.
The "City of Melbourne" squadron had 12 Buffaloes at Sungei Patani, Northern Malaya, on 8 Dec 1941. 8 destroyed on the ground that day, and the squadron withdrew to Butterworth. 2 more Buffs were shot down on 9 Dec in the first air-to-air combat for RAF fighters in the Pacific. The squadron was then withdrawn to Ipoh and merged with 453 Sq under S/L Harper (see below). Squadron embarked for Australia 27 Jan.
Sqn Ldr W F Allshorn RAAF
Flt Lt F H Williams RAAF
Flt Lt Max White RAAF (shot down 14 Dec; killed)
Flt Lt J R Kinninmont RAAF (crashed 15 Dec; claimed a scout and a Ki-43 19 Jan)
Flg Off G M Sheppard RAAF
Flg Off Bob Kirkman RAAF (claimed a Ki-51 19 Jan)
Flg Off C R McKenny RAAF (shot down 9 Dec; injured)
Flg Off H V Montefiore RAAF (shot down 9 Dec)
Flg Off D M Sproule RAAF
Flg Off J B Hooper RAAF (crashed 15 Dec)
Flg Off B Hood RAAF
Flg Off R H Wallace RAAF (crashed after midair collison 12 Jan; injured)
Sgt Henry Parsons RAAF (shot down 19 Jan; killed)
Sgt Norman Chapman RAAF (shot down 18 Jan; killed)
Sgt G Harrison RAAF (crashed after midair collison 12 Jan)

RAF 243 Squadron
15 Buffaloes at Kallang, Singapore; 2 at Kota Bharu, Northern Malaya. On 12 Dec, 4 Buffs were flown up to Ipoh and attached to 21 Sq. On 25 Dec the squadron had 15 Buffs on strength. After a long convoy escort flight over water on 2 Jan, Sgt Weber wrote in his diary: "My word, when one is so far away from land it is gratifying to recall the reliability record of the Buff's engine." The squadron lost 7 Buffs to accidents in the first week of January. Only 2 Buffs remaining on 23 Jan. Squadron disbanded 27 Jan, with planes and pilots going to 453 Sq.
Sqn Ldr Frank Howell RAF, DFC (claimed a Ki-27 16 Jan)
Flt Lt Mowbray Garden RAF (claimed a Ki-43 13 Jan; shared a Zero 16 Jan)
Flt Lt Ron Bows RAF, flight leader
Flg Off M H Holder RAF
Plt Off E A Pevreal RAAF
Plt Off Gordon Bonham RNZAF (crashed on patrol 2 Jan; wounded 18 Jan)
Plt Off T B Marra RNZAF (claimed a Ki-27 16 Jan)
Plt Off J M Cranstone RNZAF
Plt Off R S Shield RNZAF (killed in takeoff collision 5 Jan)
Sgt Rex Weber RNZAF (shared a Zero 16 Jan; crashed 4 Feb from battle damage)
Sgt Bert Wipiti RNZAF (shared claim on a Ki-46 10 Jan; claimed a Ki-43 21 Jan; claimed a bomber 22 Jan)
Sgt Max Greenslade RNZAF (shot down 23 Jan)
Sgt Charlie Kronk RNZAF (shared claim on a Ki-46 10 Jan; claimed a Ki-48 20 Jan; crashed 1 Feb after damage by a Hurricane)
Sgt Reg Newman RNZAF (shot down 12 Jan; killed)
Sgt Russell Reynolds RNZAF (shot down 13 Jan)
Sgt C F Powell RAAF (crashed on patrol 2 Jan; injured)
Sgt Geoffry Fisken RNZAF (claimed a Ki-27 Nate, two G3M Nells, and three Zeros, Jan-Feb; leading Commonwealth fighter pilot against the Japanese)
Sgt Vic Arthur RNZAF (shot down 22 Jan; killed)
Sgt Noel Rankin RNZAF (shot down 12 Jan; killed)
Sgt P L Elliott RNZAF (killed in landing collision 5 Jan)
Sgt John Oliver RNZAF (missing in action 15 Jan)
Sgt Ginger Baldwin RAF (shot down 22 Jan; killed)History of No. 243 Squadron.
Motto: " Swift in pursuit "
Badge: A seahorse holding a sword erectNo 243 Squadron was formed in August 1918 from Nos 414 and 415 Flights of the seaplane station at Cherbourg which had been functioning as an out-station of Calshot while part of the Royal Naval Air Service. Its seaplanes carried out anti-submarine patrols off the French coast and around the Channel Islands until the end of the war and it disbanded on 15 March 1919.
On 12 March 1941, No.243 reformed at Kallang as a fighter squadron for the defence of Singapore. The shortcomings of its Buffaloes were soon apparent and when Japanese fighters came within range, the squadron suffered heavy loses and by the end of January 1942 was operating its surviving aircraft as part of a mixed force, the other Buffalo squadrons being in a similar state. Its identity was gradually lost to the evacuation of redundant personnel and by the time all fighters were withdrawn from the Singapore airfields, it no longer existed as a unit, having been disbanded on 20 January 1942.
On 1 June 1942, No.243 reformed at Outston, taking over No.242 Squadron's Spitfires and became operational on the 12th. After defensive duties, it turned its aircraft over to No.232 Squadron at the end of September and in November sailed for North Africa, where it became operational again with Spitfires in Algeria in January 1943. For the rest of the Tunisian campaign, it flew sweeps and provided escorts for day bombers attacking enemy bases and transport and in June moved to Malta for similar missions over Sicily. A few days after the Allied landings there, No.243 moved into the beachhead, repeating this in September after the Salerno landings. In December 1943, it moved to the Levant and after fully converting to Spitfire IXs left for Corsica in April 1944. Escort missions and ground attack sweeps were flown over northern Italy and southern France and cover provivded for the Allied landings on the French Riviera in August before the squadron was again disbanded on 31 October 1944.
No.243 reformed on 15 December 1944 at Morecambe, two days before embarking for Canada where it began training with Dakotas. In January 1945, these began moving across the Pacific to Audtralia, where communications flights began between British bases in the South West Pacific area, mainly to British Pacific Fleet bases. By the end of the war the squadron was flying scheduled services and extended these to Hong Kong on its surrender. A large proportion of the squadron personnel was Australian and they were demobilised locally when No.243 disbanded on 15 April 1946.
Grub Street
Buffaloes over Singapore
RAF, RAAF, RNZAF and Dutch Brewster fighters in action over Malaya and The East Indies 1941-42
Brian Cull with Paul Sortehaug and Mark Haselden reviewed by Tony Oliver
ISBN: 1-904010-32-6 Hdbk 253pp 70 b/w photographs 2pages maps 5 Appendices, Bibliography and index of personnelThe B-339 Buffalo received much criticsm during its brief service with the RAF/ Commonwealth forces. Much of this condemnation was richly deserved whilst some of it wasn't. Considered unfit for service with the RAF in the ETO, the majority of the 170 Brewster fighters including diverted machines from a cancelled Belgian AF order, were crated and shipped to the Far East. It was believed by the Air Staff that there they would be more than a match for the opposition.
An opposition that was to prove far from the colonial idea of an inferior second rate air force.
But this was just the first in a catalogue of errors and inept leadership that led to the rout of Commonwealth forces from the Malay Peninsula and the East Indies resulting in the tragedy that was the fall of Singapore.
Brian Cull's book follows a similar format to his other titles all of which detail the fortunes of the aircraft and units involved in some of the lesser known and documented historic air battles of the 20th Century.
His previous titles 'Bloody Shambles' Vol's 1and 2 with Chris Shores and Yasuho Izawa (Grub Street) are an intense account of the Far East air war in the early years. This title is a logical addition and is a very thorough and detailed perspective. This is remarkable when its considered that the tide of war in this region and the swiftness of the Japanese assault on Malaya, must have left little time for accurate record keeping. Indeed reading the accounts, which are liberally spread throughout the book taken from personal diaries, squadron diaries and official records, it's obvious that the author spared no effort in thoroughly researching this title.
The title might suggest that its a reference work for Buffalo modellers, which it is not but it does have 20 pages of original black and white photographs, many of which provide clear reference for RAF and the few Dutch Buffalo schemes. There are also references in the text to specific aircraft and the elusive night-fighter Buffaloes 'Black Bess' and 'Black Beauty'. However if like me you enjoy reading and researching the historical aspect behind the mechanical subject, then this title is totally absorbing.
My one criticism would be a lack of reference maps throughout the book. It is difficult to get a mental image of the terrain and the geography of the Malay Peninsula and the location of the airfields in a strategic context, and having to flick to the back of the book for reference spoils the flow of reading somewhat.
But that said, the text brings to life via the recollections and diary anecdotes, a world and lifestyle gone forever. It also illustrates how the colonial existence among the rubber plantations was maintained right up to the point at which the Japanese were knocking at the door, indeed one of the senior officers was more concerned about saving his stamp collection than for the welfare of his ground staff!
It also dispels any myth of aerial chivalry at a time when the Battle of Britain had recently ended and along with it the popular notion of giving the other chap a fighting chance. Numerous accounts both detailed and bloody of the effects of war and deeds carried out in the name of the Imperial Japanese Emperor reinforce the image of a more barbaric campaign being fought over this outpost of the British Empire. Accounts of pilots machine-gunned in their 'chutes and strafed whilst escaping from a wreck are commonplace, as are the bombing of non-strategic targets such as residential areas and villages. I'm not saying that we should be surprised by this, as the war in the Far East is well documented in its cruelty but the accounts are vivid and original and make the book all the more real for this.
That the Commonwealth pilots were courageous in the face of overwhelming superiority of numbers and equipment goes without saying, but that courage is well illustrated here by some truly astonishing accounts of aerial conflict. Not only contending with an enemy numerically, tactically and technologically superior, but also having to cope with an aircraft so outmoded as a fighting aircraft that it couldn't be climbed on full power for fear of overheating must have made the pilots wonder whether the new day would be their last. However amongst this life went on and for the ones who made it back in one piece, or more often with pieces missing, its apparent that a damn good 'piss up' was the order of the day.
quote: "So our second engagement with the enemy was not so successful. Outnumbered ten to one, and taken completely by surprise, the boys had no chance. One lesson we have to learn is never to leave the ground when the enemy is directly overhead. Seven weary pilots went into town at night and took quarters at the 'Station Hotel' and the 'Majestic'. After a good feed and a few beers, all felt slightly better but all considerably shaken by our introduction to the real thing".
If you want to read something a bit different from the tales of the 8th AF and the Jadgdwaffe or the 'gentlemanly' conduct of the Battle of Britain and really get an insight into flying life in the Far East in the early Forties, then this would be a good place to start.
To finish here's some views on life as a Buffalo pilot from Sgt.Geoff Fisken DFC RNZAF 243Sqn
Reflections: The Buffalo:
"It was a real ladies plane, a beautiful plane to fly. Anybody could fly them. We flew them with the hoods open, it was cooler and there was no wind blast"
"I flew a Hurricane MkIIb, I didn't think it was as good as the Buffalo".
Lack of warning:
"The British always said they'd (the Japs) never come from the North. That's why all the guns pointed out to sea."
"We never got any warning, nine times out of ten, by the time we took off, they were over us."
Japanese Pilots:
"They were very good, they were very, very good over Singapore.
"You could only get away in a Buffalo by diving straight down, they never followed you down."
"Their aircraft were so much lighter, they were much more manoeuvrable, they had us beat."
"To dogfight with a Jap was committing suicide, it was impossible."(the Ki-43 Hayabusa could turn inside a Buffalo with ease)
"The only way of getting a victory, was by bashing in, get a three second burst and then get out of it."
And finally fifty one year old Group Cpt. Rice; he was made prisoner after Singapore and did not survive his captivity. Sqn Ldr Howell forwarded Rice's report on the actions of 243Sqn to the Air Ministry on his release.
"Up against superior aircraft, and outnumbered 6 to 1, they showed a spirit equal to if not greater, than that of the pilots in the Battle of Britain (Rice served in the BoB). With practically no hope of rescue if shot down, they pursued the enemy and succeeded in shooting down in excess of 60 aircraft. The ground crews did all in their power to keep the aircraft in the air, under very trying and exhausting conditions. Great work was done by pilots and crews under difficulties"
Brian Cull's follow up to this title will be Hurricanes over Singapore.
Recommended historical reading.

Commonwealth Buffalo squadrons in Southeast Asia
When the war broke out, the British had four Buffalo squadrons at Singapore and in Northern Malaya. Another was stationed in Burma.
The pilots included only 15 who actually served in the Royal Air Force. The others were officers or (the majority) sergeant-pilots from Australia and New Zealand. Altogether, the Buffalo pilots numbered 118, of whom 28 were killed and another was captured--25 percent lost in less than two months. Several others were badly injured.
U.S. Army equivalent ranks: squadron leader = major, flight lieutenant = captain, flying officer = 1st Lt, pilot officer = 2nd Lt
RAAF 453 Squadron
18 Buffaloes and 1 Tiger Moth at Kallang, Singapore. 16 Buffs were sent north to Ipoh on 13 Dec, and the squadron earned the first solid air-to-air claim for a Buffalo that day, though the station commander and another pilot were killed when they crashed out of fuel. The newly appointed station commander, Wing Cdr L J Neale RAF, crashed 13 Dec and was injured. Got new a/c and withdrew to Kuala Lumpur, southern Malay, 19 Dec. First major air-to-air combat with the 64th Sentai on 22 Dec, 12 Buffs vs 18 Nakajima Ki-43 Hayabusas. With 3 a/c remaining, withdrew to Singapore island and got more aircraft, with the merged 21/453 Sq having 16 Buffaloes on 25 Dec. The Japanese by this time were flying from British airfields in Northern Malaya. With 4 Buffs remaining on 24 Jan, this was the only Buffalo squadron still functioning at the end of that month. At least 7 Buffs were flown out to Dutch Indies first week of February, and another (evidently the last) on 11 Feb.
Sqn Ldr Harper W H Harper RAF
Flt Lt Tim Vigors RAF DFC (shot down 13 Dec; injured)
Flg Lt R D Vanderfield RAAF, flight leader (claimed 2 Ki-48s on 13 Dec; claimed a bomber 15 Jan; claimed a Ki-51 19 Jan)
Flt Lt B A Grace, RAAF flight leader
Flg Off F Leigh Bowes RAAF (claimed a bomber 15 Jan)
Plt Off G L Angus RAAF (crashed 13 Dec)
Plt Off D R L Brown RNZAF, on attachment from 243 Sq (crashed 13 Dec; killed)
Plt Off R W Drury RAAF (crashed 22 Dec; killed)
Plt Off T W Livesey RAAF (crashed 13 Dec; injured; crashed 22 Dec)
Sgt J Austrain KC
Sgt Harry Griffiths RAAF (crashed on patrol 3 Jan; injured)
Sgt M N Read RAAF (claimed a Ki-51 on 13 Dec; shot down 22 Dec; killed)
Sgt S G Scrimgeour RAAF (shot down 22 Dec)
Sgt V A Collyer RAAF (claimed a Ki-51 on 13 Dec)
Sgt W R Halliday RAAF
Sgt A W B Clare RAAF (claimed a Ki-43 17 Jan)
Sgt Keith Gorringe RAAF (claimed a Ki-51 19 Jan; crashed 29 Jan)
Sgt R R Oelrich RAAF (shot down 13 Dec; killed)
Sgt E A Peterson RAAF (shot down 22 Dec; killed)
Sgt G R Board RAAF (crashed 18 Dec; shot down 22 Dec)
Sgt J Summerton RAAF
Sgt K R Leys RAAF (shot down 21 Dec)
Sgt M B O'Mara RAAF
Sgt Geoff Seagoe RAAF (shot down 1 Feb)

RNZAF 488 Squadron
17 Buffaloes at Kallang, Singapore; 16 remaining on 25 Dec. This was the least-trained Buffalo squadron. The diarist wrote on 4 Jan: "The Squadron, thought not fully operational, has reached a high standard.... 90% of the pilots are quite at home in Buffaloes as far as throwing the machines around is concerned, but have had very little altitude flying [because] the Buffalo engine will not stand up to full-throttle climbs. We have had cases of engine loss of power through drop of oil pressure and excess oil temperature. The maximum height that can be reached is 25,000 feet." The squadron's first combat was on 12 Jan, with two Buffs lost and five damaged with no claims by the Kiwis. With only 2 Buffs remaining on 23 Jan, it handed them over to 243 Sq and was requipped with Hurricanes, and MacKenzie replaced Clouston as sqn ldr.
Sqn Ldr Wilf Clouston RAF, DFC
Flt Lt (later sqn ldr) J N MacKenzie RAF, DFC
Flt Lt J R Hutcheson RNZAF (shot down 13 Jan; shot down 17 Jan)
Plt Off Frank Oakden RNZAF (shot down 13 Jan)
Plt Off P D Gifford RNZAF
Plt Off J C Godstiff RNZAF (crashed 4 Jan; injured)
Plt Off Keith McAneny RNZAF (crashed 12 Jan; shot down 19 Jan; killed)
Plt Off H S Petit RNZAF
Plt Off G P White RNZAF
Plt Off Greville Hesketh RNZAF (shot down 15 Jan; killed)
Plt Off Bill Greenhalgh RNZAF
Plt Off Noel Sharp RNZAF (claimed a Ki-43 13 Jan; claimed a Zero 17 Jan; crashed 17 Jan)
Plt Off Frank Johnstone RNZAF (crashed 17 Jan)
Plt Off Ernie Cox RNZAF (shot down 17 Jan; killed)
Plt Off L R Farr RNZAF
Sgt W J N MacIntosh RNZAF
Sgt Ed Kuhn RNZAF (crashed 13 Jan; claimed a Ki-27 15 Jan)
Sgt Terry Honan RNZAF (shot down 12 Jan; injured)
Sgt Bob MacMillan RNZAF (shot down 12 Jan)
Sgt W R De Maus RNZAF
Sgt H J Meharry RNZAF
Sgt Don Clow RNZAF (crashed out of fuel 13 Jan)
Sgt Vic Meaclem RNZAF (crashed 12 Jan)
Sgt P E E Killick RNZAF (claimed a Zero 17 Jan)
Sgt J Burton RNZAF
Sgt C D Charters RNZAF (shot down 19 Jan; captured)
Sgt Alex Craig RNZAF (crashed 18 Dec; killed)
RAF 67 Squadron
16 Buffaloes at Mingaladon, Burma, with occasional dispersals to advanced fields at Moulmein and along the Tenasserim peninsula. First actions were strafing across the border in Malaya; heavily engaged defending Rangoon from Japanese bombers on 23 and 25 Dec, and again on 24 Jan. Withdrawn to Magwe on xx Feb and with 4 remaining aircraft to India on 10 Mar.
Sqn Ldr R A Milward RAF, DFC (wounded by shrapnel 23 Dec)
Flt Lt Jack Brandt RAF (took command 15 Jan)
Flt Lt Colin Pinckney RAF (claimed a bomber on the ground 13 Jan; shot down 23 Jan; killed)
Flg Off P M Bingham-Wallis RAF
Flg Off J S Wigglesworth RAF (crashed 29 Jan; killed)
Flg Off John Lambert RAF (claimed a Ki-21 23 Dec; shot down 25 Dec; killed)
Plt Off G S Sharp RNZAF
Plt Off H Christensen RNZAF
Plt Off C McG Simpson RNZAF
Plt Off Paul Brewer RNZAF (shot down 20 Jan; killed)
Plt Off A A Cooper RNZAF
Plt Off P Parsonson RNZAF
Sgt Vic Bargh RNZAF (claimed a Ki-21 23 Dec)
Sgt John Macpherson RNZAF (shot down 25 Dec; killed)
Sgt E E Pedersen RNZAF
Sgt Ken Rutherford RNZAF
Sgt E L Sadler RNZAF
Sgt Gordon Williams RNZAF
Sgt G Norton RAAF
Sgt E H Beable RNZAF
Sgt W J Christiansen RNZAF
Sgt P T Cutfield RNZAF
Sgt John Finn RNZAF (shot down 20 Jan; killed)
Sgt Ted Hewitt RNZAF (shot down 25 Dec; killed)
Sgt Ron McNabb RNZAF (shot down 25 Dec; killed)


Admiral Isoroku Yamamoto Japanese Aces by Full Name A6M Operators Japanese Aces by Surname Imperial Japanese Naval air units Japanese Aces by service and highest number of Kills


Bibliography:
- Bueschel, Richard M. Mitsubishi A6M1/2/-2N Zero-Sen in Imperial Japanese Naval Air Service. Canterbury, Kent, UK: Osprey Publications Ltd., 1970. ISBN 0-85045-018-7.
- Francillon, René J. The Mitsubishi A6M2 Zero-Sen (Aircraft in Profile number 129). Leatherhead, Surrey, UK: Profile Publications Ltd., 1966.
- Francillon, René J. The Mitsubishi A6M3 Zero-Sen ("Hamp") (Aircraft in Profile number 190). Leatherhead, Surrey, UK: Profile Publications Ltd., 1967.
- Green, William and Swanborough, Gordon. The Great Book of Fighters. St. Paul, Minnesota: MBI Publishing, 2001. ISBN 0-7603-1194-3.
- Jackson, Robert. Combat Legend: Mitsubishi Zero. Ramsbury, Marlborough, Wiltshire, UK: Airlife Publishing, 2003. ISBN 1-84037-398-9.
- Juszczak, Artur. Mitsubishi A6M Zero. Tarnobrzeg, Poland/Redbourn, UK: Mushrom Model Publications, 2001. ISBN 83-7300-085-2.
- Marchand, Patrick and Takamori, Junko. (Illustrator) A6M Zero (Les Ailes de Gloire 2) (in French). Le Muy, France: Editions d’Along, 2000. ISBN 2-914403-02-X.
- Mikesh, Robert C. Warbird History: Zero, Combat & Development History of Japan's Legendary Mitsubishi A6M Zero Fighter. Osceola, Wisconsin: Motorbooks International, 1994. ISBN 0-87938-915-X.
- Mikesh, Robert C. and Watanabe, Rikyu. (Illustrator) Zero Fighter. London: Jane's Publishing Company Ltd., 1981. ISBN 0-7106-0037-2.
- Nohara, Shigeru. A6M Zero in Action(Aircraft #59). Carrollton, Texas: Squadron/Signal Publications, Inc., 1983. ISBN 0-89747-141-5.
- Nohara, Shigeru. Mitsubishi A6M Zero Fighter (Aero Detail 7) (in Japanese with English captions). Tokyo, Japan: Dai Nippon Kaiga Company Ltd., 1993. ISBN 4-499 22608-2.
- Okumiya, Masatake and Hiroikoski, Jiro (with Caidin, Martin). Zero! The Story of Japan's Air War in the Pacific: 1941-45. New York: Ballantine Books, 1956. No ISBN.
- Richards, M.C. and Smith Donald S. Mitsubishi A6M5 to A6M8 'Zero-Sen' ('Zeke 52')(Aircraft in Profile number 236). Windsor, Berkshire, UK: Profile Publications Ltd., 1972.
- Sakaida, Henry. Imperial Japanese Navy Aces, 1937–45. Botley, Oxford, UK: Osprey Publishing Ltd., 1998. ISBN 1-85532-727-9.
- Sakaida, Henry. The Siege of Rabaul. St. Paul, Minnesota: Phalanx Publishing, 1996. ISBN 1-883809-09-6.
- Sheftall, M.G. Blossoms in the Wind: Human Legacies of the Kamikaze. New York: NAL Caliber, 2005. ISBN 0-451-21487-0.
- Willmott, H.P. Zero A6M. London: Bison Books, 1980. ISBN 0-89009-322-9.
- Wilson, Stewart. Zero, Hurricane & P-38, The Story of Three Classic Fighters of WW2 (Legends of the Air 4). Fyshwick, Australia: Aerospace Publications Pty Ltd., 1996. ISBN 1-875671-24-2.
Magazine References: +
- Airfix Magazines (English) - http://www.airfix.com/
- Avions (French) - http://www.aerostories.org/~aerobiblio/rubrique10.html
- FlyPast (English) - http://www.flypast.com/
- Flugzeug Publikations GmbH (German) - http://vdmedien.com/flugzeug-publikations-gmbh-hersteller_verlag-vdm-heinz-nickel-33.html
- Flugzeug Classic (German) - http://www.flugzeugclassic.de/
- Klassiker (German) - http://shop.flugrevue.de/abo/klassiker-der-luftfahrt
- Le Fana de L'Aviation (French) - http://boutique.editions-lariviere.fr/site/abonnement-le-fana-de-l-aviation-626-4-6.html
- Le Fana de L'Aviation (French) - http://www.pdfmagazines.org/tags/Le+Fana+De+L+Aviation/
- Osprey (English) - http://www.ospreypublishing.com/
- Revi Magazines (Czech) - http://www.revi.cz/
Web References: +
- Wikipedia, the free encyclopedia: https://en.wikipedia.org/wiki/List_of_air_groups_of_the_Imperial_Japanese_Navy
- Wikipedia, the free encyclopedia: https://en.wikipedia.org/wiki/Mitsubishi_A6M_Zero
- Wikipedia, the free encyclopedia: https://en.wikipedia.org/wiki/Imperial_Japanese_Navy_Air_Service
- Wikipedia, the free encyclopedia: https://en.wikipedia.org/wiki/List_of_Mitsubishi_A6M_Zero_operators
- Wikipedia, the free encyclopedia: https://en.wikipedia.org/wiki/Kamikaze
- Wikipedia, the free encyclopedia: https://en.wikipedia.org/wiki/Tetsuz%C5%8D_Iwamoto
- Wikipedia, the free encyclopedia: https://en.wikipedia.org/wiki/Tainan_Air_Group
- Wikipedia, the free encyclopedia: https://en.wikipedia.org/wiki/1st_Air_Fleet
- http://mitsubishi_zero.tripod.com/
- http://ww2db.com/aircraft_spec.php?aircraft_model_id=3
- http://www.combinedfleet.com/ijna/a6m.htm
- http://www.combinedfleet.com/ijna/a6m-k.htm
- http://www.combinedfleet.com/ijna/a6m-n.htm
- http://www.j-aircraft.com/research/WarPrizes.htm
 Editor for Asisbiz: Matthew Laird Acred
If you love our website please donate so we can make this site even better !!
